Tuesday 1 December 2015

Biblography

Bibliography

A complete guide to special effects makeup: Conceptual artwork by Japanese makeup artists (2007) Japan: Graphic-Sha Publishing.
BBC (no date) Pictures: Harry Potter studio tour, Leavesden studios - CBBC Newsround. Available at: http://www.bbc.co.uk/newsround/15148788 (Accessed: 1 December 2015).
Bowdoin, T. (2014) ‘American horror story: Freak Show’ introduces lobster boy, Three-Breasted woman [Photos]. Available at: http://www.inquisitr.com/1489437/american-horror-story-freak-show-introduces-lobster-boy-three-breasted-woman-photos/ (Accessed: 1 December 2015).
Child, B. (2015) Monster-maker Rick Baker to retire, citing ‘cheap and fast’ Hollywood effects. Available at: http://www.theguardian.com/film/2015/may/29/rick-baker-retire-monster-maker-hollywood-effects (Accessed: 1 December 2015).
Conjoined twins (2015) in Wikipedia. Available at: https://en.wikipedia.org/wiki/Conjoined_twins (Accessed: 1 December 2015).
Ectrodactyly (2015) in Wikipedia. Available at: https://en.wikipedia.org/wiki/Ectrodactyly (Accessed: 1 December 2015).
Georges melies (no date) Available at: https://www.google.co.uk/search?q=georges+melies&biw=1242&bih=566&source=lnms&tbm=isch&sa=X&sqi=2&ved=0ahUKEwj_neaEiLvJAhVBfRoKHWDUAYQQ_AUIBigB#tbm=isch&q=georges+melies+makeup&imgrc=WMI9QkeXYC5DOM%3A (Accessed: 1 December 2015).
Jill+Reilly (2013) Are these the most life-like sculptures ever produced?. Available at: http://www.dailymail.co.uk/news/article-2514500/Are-life-like-sculptures-produced-Artist-creates-hyper-realistic-models-humans.html (Accessed: 1 December 2015).
Miller, G. (2007) Inside ‘Harry Potter and the order of the phoenix’.Available at: http://entertainment.howstuffworks.com/harry-potter-phoenix4.htm (Accessed: 1 December 2015).
Pednaud, T. J. (2006) GRADY STILES JR. - the murderous lobster man circus freaks and human Oddites. Available at: http://www.thehumanmarvels.com/grady-stiles-jr-the-murderous-lobster-man/ (Accessed: 1 December 2015).
Ralph Fiennes’ chilling Voldemort transformation (2008) Available at: http://www.harrypotterfans.com/2011/04/ralph-fiennes-chilling-voldemort-transformation/ (Accessed: 1 December 2015).
Rickitt, R. and Harryhausen, R. (2007) Special effects: The history and technique. New York, NY: Crown Publishing Group.
Team, M. (2012) Facial anatomy and proportions - HAIR AND MAKEUP ARTIST HANDBOOK. Available at: http://hair-and-makeup-artist.com/facial-anatomy-proportions/ (Accessed: 1 December 2015).
(no date) Available at: http://i.dailymail.co.uk/i/pix/2013/12/04/article-2514500-19D5C20C00000578-553_964x564.jpg (Accessed: 1 December 2015).
(no date) Available at: https://en.wikipedia.org/wiki/Rick_Baker_(makeup_artist) (Accessed: 1 December 2015).

Citations, Quotes & Annotations

A complete guide to special effects makeup: Conceptual artwork by Japanese makeup artists (2007) Japan: Graphic-Sha Publishing.
(A complete guide to special effects makeup: Conceptual artwork by Japanese makeup artists, 2007)
BBC (no date) Pictures: Harry Potter studio tour, Leavesden studios - CBBC Newsround. Available at: http://www.bbc.co.uk/newsround/15148788 (Accessed: 1 December 2015).
(BBC, no date)
Bowdoin, T. (2014) ‘American horror story: Freak Show’ introduces lobster boy, Three-Breasted woman [Photos]. Available at: http://www.inquisitr.com/1489437/american-horror-story-freak-show-introduces-lobster-boy-three-breasted-woman-photos/ (Accessed: 1 December 2015).
(Bowdoin, 2014)
Child, B. (2015) Monster-maker Rick Baker to retire, citing ‘cheap and fast’ Hollywood effects. Available at: http://www.theguardian.com/film/2015/may/29/rick-baker-retire-monster-maker-hollywood-effects (Accessed: 1 December 2015).
(Child, 2015)
Conjoined twins (2015) in Wikipedia. Available at: https://en.wikipedia.org/wiki/Conjoined_twins (Accessed: 1 December 2015).
(Conjoined twins, 2015)
Ectrodactyly (2015) in Wikipedia. Available at: https://en.wikipedia.org/wiki/Ectrodactyly (Accessed: 1 December 2015).
(Ectrodactyly, 2015)
Georges melies (no date) Available at: https://www.google.co.uk/search?q=georges+melies&biw=1242&bih=566&source=lnms&tbm=isch&sa=X&sqi=2&ved=0ahUKEwj_neaEiLvJAhVBfRoKHWDUAYQQ_AUIBigB#tbm=isch&q=georges+melies+makeup&imgrc=WMI9QkeXYC5DOM%3A (Accessed: 1 December 2015).
(Georges melies, no date)
Jill+Reilly (2013) Are these the most life-like sculptures ever produced?. Available at: http://www.dailymail.co.uk/news/article-2514500/Are-life-like-sculptures-produced-Artist-creates-hyper-realistic-models-humans.html (Accessed: 1 December 2015).
(Jill+Reilly, 2013)
Miller, G. (2007) Inside ‘Harry Potter and the order of the phoenix’.Available at: http://entertainment.howstuffworks.com/harry-potter-phoenix4.htm (Accessed: 1 December 2015).
(Miller, 2007)
Pednaud, T. J. (2006) GRADY STILES JR. - the murderous lobster man circus freaks and human Oddites. Available at: http://www.thehumanmarvels.com/grady-stiles-jr-the-murderous-lobster-man/ (Accessed: 1 December 2015).
(Pednaud, 2006)
Ralph Fiennes’ chilling Voldemort transformation (2008) Available at: http://www.harrypotterfans.com/2011/04/ralph-fiennes-chilling-voldemort-transformation/ (Accessed: 1 December 2015).
(Ralph Fiennes’ chilling Voldemort transformation, 2008)
Rickitt, R. and Harryhausen, R. (2007) Special effects: The history and technique. New York, NY: Crown Publishing Group.
(Rickitt and Harryhausen, 2007)
Team, M. (2012) Facial anatomy and proportions - HAIR AND MAKEUP ARTIST HANDBOOK. Available at: http://hair-and-makeup-artist.com/facial-anatomy-proportions/ (Accessed: 1 December 2015).
(Team, 2012)
(no date) Available at: http://i.dailymail.co.uk/i/pix/2013/12/04/article-2514500-19D5C20C00000578-553_964x564.jpg (Accessed: 1 December 2015).
(no date)
(no date) Available at: https://en.wikipedia.org/wiki/Rick_Baker_(makeup_artist) (Accessed: 1 December 2015).
(no date)

Technical evaluation

The technical side of the project is a side I wanted to concentrate most in as I was slightly nervous as I've never done it before and I'm not confident with numbers so I suppose I worried myself before it stared. After doing my first turn with creating the moulds I was a lot more confident with the correct terminology and processes I found out aspects about silicone that I didn't know previously such as it doesn't work with garlic or alo Vera. I struggled  most on  getting equal amounts of the silicone A and B have been hard as it was very easy to go slightly over and knowing how much silicone you need for your piece as I had waste products Learning the process of making silicone moulds  was dificult as there was so many aspects that you have to remember and get exactly right as the first time we did it with the wounds I did make mistakes as I moved my mould as it was setting it did set a little wonky and I learnt while making the mixtures you have to work really quickly as they set and won't work for you. I over came the issue of it being slightly wonky by propping it up with sticks I did have to start the process again as I didn't work quickly enough and the mixture set before I could pour it in , although in an ideal world  I wouldn't had made any mistakes but you don't learn from not making mistakes, it really helped doing the wounds first as my confidence for the hybrid was much better and I realised that having my notes on me was crucial and what I made mistakes on such as forgetting to spray petrolease didn't happen as I could refer to my notes and I remembered from before. Beeing clean and organised was another aspect I learnt from the wounds as I didn't have all my equiptment ready with my wounds that's why I ran out of time to pour my mixture so with my hybrid I made sure I was prepared with cling film over my surface and everything that I needed was there which made it a lot easier and Less stressful. I found out that I really enjoy sculpting I find it really therapeutic and loved seeing the end result although I did have a lesson that my mould does need to be flat so the silicone doesn't go underneath it was annoying at first as I really loved my original flower but I carried on re making it and was happy with the over all result. The application of the silicone took awhile and concentration to blend in the edges.

Hybrid


Hybrids are most common in early myths and legends  and can be split into two groups.
Human hybrids such as mermaids and centaurs(half human half horse) and non human hybrids like a griffin.One of the most famous hybrids is the sphinx in egypt, half human half lion. The ancient egyptians gods were usually delicted with animal heads on human bodies . Like anubis, jackel head and horus, falcon head.There are very few examples of plant human hybrid, however the Ents in lord of the rings can be classed as such because the are trees with human abilities.. they talk walk and have faces and personalities. Some scandanavian legends say that these type of hybrids are the protectors of the forest.Anubis was the gid of the afterlife. He was depicted with a jackals head on a human body. It was also his role to weigh the human heart against an ostrich feather. If the heart was heavier than the feather the person went to hell and if it was lighter the person went to heaven. People think that he was portrayed this way because jackals are scavengers who clean up the kills of other people.
Mermaids are present in many worldwide cultures including the middle east africa and asia. The first recorded mermaid was when a goddess turned herself into a mermaid out of shame for killing her human lover. They can be seen as foretelling dangerous times as well as bringing love.

Evaluation

 I am really pleased with my final outcome of my hybrid I feel that I wasn't too stressed through out the assessment It took me around 5 hours to create I feel that I spent more time trying to get it perfect and finalised. One aspect that I would have liked to enhance is the use of ridgid collidion for my scarification but my model didn't like the feel of it tightening around his neck so I didn't do too many layers I did 4 layers which did work effectively and the cracking around the skin and neck orginally I didn't really like but adjusting it worked well as I feel it added to the look, also doing the roots ( veins) in green, purple and blue adding more colour too it as I feel it could have looked bland without it and it added to the mythical feel I wanted. using the flowers and leaves around my silicone branches really worked well I feel it added more drama to the look I enjoyed attaching the pieces   And I liked how it framed my work . Im really happy with the placement of my flower I feel it was perfect where it was it looked like the source of the hybrid which I wanted, The top edge of the flower didn't blend in exactly like I wanted which I would go back and change. Also in hindsight I wouldn't have painted my models eyebrows white I would have just added a slight touch of foundation over them. The branches I firstly started to build up the colour and I wanted them to have a lot of dark colours on it but when adding the dark brows it didn't work out as well so I decided to have them the same colour as the foundation which I feel worked out better. I did work very hard on my hybrid and I'm not the best with technology so when it came to taking my photos I wasn't sure on the settings so that's an aspect as I feel my hybrid looked a lot better than was photographed but that's my own fault for not pre planning the settings The application of the silicone took awhile and concentration to blend in the edges  but once that was done I really enjoyed buliding up the colours and creatin my final piece! over all I'm very pleased with the out come and I loved this project and wish it lasted longer, it has given me self belief and confidence for the future!

Moodboard for hybrid

I chose these images for my mood board as I like how they incorpate humans and nature i chose the rose as I want the rose to be skin coloured and the veins and roots look similar and feel that they work well together this mood board has helped me collect my ideas together.

Sunday 29 November 2015

Application!
I really concentrated on my application as I did want it to feel as if  my pieces were part of the body.Firstly I cleaned my mould to get rid of any talc or dust left on from removing it then you  apply Pros aid too where you want to apply your piece and on the piece its self you wait a few moments till the glue goes clear on both the skin and the mould if you don't wait for it too go clear then you may have the issue of seeing the glue underneath your piece which isnt something you want the you press it down onto the skin once the glue has dried. Once its attached you take a cotton bud and alcohol and start blending  untill I was pleased with the out come I found this the most time consuming as it does take awhile to get the edges blended but I do feel that the application went well and I was especially pleased with my flower as I found that hardest to blend out.

Saturday 28 November 2015

Human hybrid

using the concept of a physical transformation as part of my character of brave new world!
My hybrid is going to be representing deforestation and how we've become the things that we've destroyed (nature) I want my character to show that we humans have evolved into creatures of nature using aspects from nature such as branches, trees, flowers, leaves etc I want to use vains( roots) going up the neck and body of my hybrid and using them as part of scarification to show the pain and suffering. I want to have the flower in the centre of the neck Inbetween the collor bones and have he roots coming from the flower. Using the scaring liquid rigid colldion.

This was my first idea of my hybrid


I wanted to branch like pieces coming from the eyebrows to the top of the head, create vains under the eyes, contour the cheeks drastically have roots (vains ) coming from the flowers and have different type of flowers on the chest area. But after thinking over my look I felt I could make it more interesting by having too branches going from each side then having flowers, leaves etc filling the gap in the head and having flowers on top of the eyebrows then filling the eyebrows in white and having only one flower on the chest as a main feature and to have  the roots coming from the flower as if its the source of the pain.I  was going to do the roots as neutral colours but I decided to do them like purples and greens to add colour into my piece then covering them with ridgid collidion to create the scarification and got rid of the vains under the eyes as I felt it was too much and did some slight strobing on top of the cheek bones. I want the flower and branches to be skin colour so it looks part of the body.


Hybridssss!!!!!!


These are my final images for my Human Hybrid  firstly I started by applying my silicone molds which I explained the process in my  next post. I then started by using foundation and blending onto the ears and chest after I had finished using my Kryolan pallet I then went onto drawing out my roots(veins) I chose to do to use greens, purples and light blues to add some colour into the face and make it a bit more dramatic and eye catching after I finished drawing on my roots I then started to do my layers of ridged collion  I did around 4 layers and my model moved while it was setting so it slightly split although at first I did panic I found that I liked the look it gave to the cracked looking skin. I decided that I wanted to paint my flower using kryolan foundation using the same colour I used all over the face and body and then using slightly darker and lighter foundations to highlight and use in the shadows. After I was pleased with the look I powdered then I drew fine lines of illamsaqua white base foundation onto the eyebrows. For my branches I firstly painted them the same colour foundation to the face then with my flesh tone pallet I started dabbing other flesh tones into the branches adjusting to get the look of a rough texture I did try it all brown but I felt that didnt work so I went with the foundation colour and worked on top of that which I feel in the end worked well as to give off the rough bark look. Then added  a nude brown and slightly metallic gold to the lips. Once that was all done I added Laura Mercier candle glow to the cheek bones nose and eye lids to add some shine.  Then onto the hair I gelled all the hair back with a comb then sprayed with some gold glitter spray once the hair was all back I then started choosing which flowers I started to stick down and place around and in between the branches chose which flowers I wanted to replace the eyebrows with and then covered the chest area with them almost creating a boarder around I used Pros aid to attach my flowers I chose the browns, yellows and whites as I wanted it too be neutral colors. Overall I am happy with my final piece! I feel it works well with my concept and I love the final look and I feel proud that I completed it. The rose as a center point worked well and although I was worried that the branches may look like some sort of horns I feel by having the flowers it really transformed the look! If I were to do this again I would then add more layers of the ridged collidon to make the scars look even deeper as I do love the ones where you can see it looks deep but I would try and use a natural colour for them If I were to do this again but I'm happy with it over all and feel for my first attempt it can only progress and develop my ideas further for the future!


The process of making my molds for my hybrid
Firstly with fixing spray, spray the sculpted pieces lightly and wait for the pieces to go matte,.making sure you have a window open.
Then Spray your mold with Petrolease . Dont spray too much as it takes awhile to dry
Lay some cling film over your scales and work surface
 Label a spatular with the letter 'A' and another spatula with the letter 'B'. This is so you know you are using Sillicone A and Sillicone B. This ensures you don't contaminate Silicones A and B
Measuring out  15grams of a into my cup using scales
with the same cup measure 15grams of Sillicone B in this cup. The quantities have to be exactly the same or the Silicone will not set and your piece will be ruined. mixing it  well and tapping gently if any air bubbles occur
Once  mixed thoroughly, pour this all over your molds, making sure all of the mold to the top is covered. Then leave your molds to stand for roughly an hour to give this time to harden.
 After the Silicon has become non-sticky and rubbery like take your molds out. 
 Clean your molds with  Alcohol.
Spray your mold with Petrolease and wait to dry
 Pour some  Alcohol into a cup with  baldez and mix this up. The mixture should be 1-2. One of baldez and two IPA. This mixtures does not have to be exact like the silicone does. 
Then with a  paintbrush brush over the mold area getting this into the center especially with my rose I had to concentrate on covering it. Once a light coating has been applied wait for this to dry then apply a second layer
 After that's dry you mix silicone A&B and deander I did 15 grams of a 15 grams of B  and 23 grams of deander,  deander is the agent of silicone that makes it flesh likes. I maked sticks A, B and C not to get confused and mix them up and changed my gloves each time I used a different product.
Once they were mixed together I added my droplets of pigments I used a pale skin colour and white you don't need to add too much off the pigment mix well and gently tap on the table to get rid of any bubbles then pour over the mold working quickly as my first time I waited too long so it didn't set properly and I had to re- do the process also my mold was flat as I must have moved it while it wasn't set so I had to prop it up with sticks but once I did it again it worked perfectly. While spreading the product use a ruler to make sure the top surface is even by spreading the product across evenly.
You wait for that to dry and the with talc you brush the edges up slowly making sure you don't rip it and keep brushing slowly and adding talc till you can remove your piece!


Friday 27 November 2015

Rick baker

 https://en.wikipedia.org/wiki/Rick_Baker_(makeup_artist)
https://en.wikipedia.org/wiki/Rick_Baker_(makeup_artist)#/media/File:Rick_Baker_February_2015_(cropped).jpg
http://www.theguardian.com/film/2015/may/29/rick-baker-retire-monster-maker-hollywood-effects

Rick Baker February 2015 (cropped).jpgRick baker started making prosthetic pieces in his own kitchen, he started off being the assistant to prosthetic makeup effects veteran Dick Smith on the film The Exorcist. Then he got his  inaugural Academy Award for Best Makeup and Hairstyling for his work on An American Werewolf in London He also created the "werecat" creature Michael Jackson transforms into in the music video ThrillerBaker has been nominated for the Best Makeup and Hairstyling Oscar ten more times, winning on seven occasions, both records in his field. On wards from that hes been creating beautiful creatures for films such as men n black. I really like how the detail of every creature really stands out for example they may have similar features but all have their own personality within the piece that makes them individual. And you can see the dedication he puts into each piece that does make me want to make mine to the best of my ability. 
I really respect baker as in an interview he says;
“I said the time is right, I am 64 years old, and the business is crazy right now. I like to do things right, and they wanted cheap and fast,” said Baker. “That is not what I want to do, so I just decided it is basically time to get out. 
which I feel is the positive and right attitude to produce the best quality of work and from looking at his work I really aspire to it.

Looking at these I love the texture he puts into his work the brain is very neat and excellently executed with with them going down the front lobe also I like how the ear is out lined as humans would usually have ears there . I'm especially interested in his work a she does do a lot of high breads as the 'brain man' has human features such as the eyes nose and mustache which helps me think of ideas that I can work with on my hybrid. 

voldemort


I decided to look at the magnificent Lord Voldemort an iconic hybrid that is half human  with snake like features. The build up to what 'he who must not be named' looked like was executed amazingly as this creature with the half formed nose and features and veins on the head   which inspired me to try with the veins I wanted to create for my own hybrid what researching lord Voldemort taught me is that not all of it was make-up some of it was filming effects such as the nose As the actor Ralph Fiennes’ didn't want too much make-up as he felt it would effect the way he acted in his role and wanted too act freely. I do like the idea of the bald cap and and adding veins too my look I love how it looks indented into his head. The make-up artist Sean Harrison worked well with the visual effects team to create such a remembered character. The fear factor that lord Voldemort brings is such and important factor that theyve worked with so well The only make-up he had on during scenes were the eyebrow pieces and the veins on his head.


How long does this sinister makeover take? At least two-and-a-half hours for Fiennes, who viewed the time as essential to his portraying the full evilness of You-Know-Who. “A certain look that you have helps you locate who you’re being. You look at yourself in the mirror, you see this face, and you say, ‘I know who I am,’” Fiennes told MTV News.

This quote shows me how important makeup is within getting the actor into charter it helps them feel the role and enhances the performance. an d where he says you look in the mirror and say 'I know who I am' has taken to me as the audience will feel the same.


http://www.harrypotterfans.com/2011/04/ralph-fiennes-chilling-voldemort-transformation/


Final of second degree burn

Creating my blister!
Firstly I cleaned my mould to get rid of any talc or dust left on from removing it then you  apply Pros aid too where you want to apply your piece and on the piece its self you wait a few moments till the glue goes clear on both the skin and the mould if you don't wait for it too go clear then you may have the issue of seeing the glue underneath your piece which isnt something you want the you press it down onto the skin once the glue has dried. Once its attached you take a cotton bud and alcohol and start blending the edges I found this the longest part of the process as It can get quiet fiddly I found on my piece that once side blended very easily but one side was slightly harder to blend but with perseverance  got both sides the same  which I was pleased about. Then I started painting with my flesh toned pallet which activates with alcohol  I started with a skin colour at first then added the yellow to make it look like a painful blister then I started with my supra colour pallet to add redness to the out side to make it look sore blended that around the outside trying not to add to much product as I wanted it to look realistic. Once I mixed the yellow with the skin colour I looked back at my research and seen that I needed to make it slightly more yellow but I did fear it wouldn't look real if i used too much yellow as in person it looked fine and I was pleased with it but on camera it looked a little too theatrical and yellow so I added more skin colour to it then added Vaseline on top.
                                                                         Over all I'm pleased with my first special effects piece! it's taught me alot about the process and I feel alot more confident for creating my hybrid . I liked the roughness of the skin around the blister I feel it makes it look more painful and newly burnt. Aspects I would improve would be to use slightly less  yellow but overall I am really pleased with my piece.

Health and Safety


-Keep windows open to improve ventilation as there can be a build up of fumes
-Wear appropriate clothing. Make sure they are old as they will most likely get messy with Silicone and silicone will not come out at all.

-Masks should be worn throughout the majority of mould making as most products give off strong fumes. This is mainly the super baldiez. 
-Do not wear anything on your skin with Aloe Vera in as the moulds will not stick to the skin.
-Do not eat garlic the night before or on the day that you will be using Silicone as the Silicone does not like garlic and the Silicone will not set. Do not even work with Silicon in the same room that garlic is being prepared in.
-Do not pour any Special Substance down the sink as this could poison the water supply or block the pipes. You must scoop with couch roll and put this in the bin.
-All make sure that you keep the lids on the products after you have used them, encase they get knocked over. Because the products are very expensive and they could get contaminated or dry up.
-Wipe round all the lids with baby wipes after you have used them to clean them. This prevents the lids getting stuck the next time you want to use the product.
-Be responsible for your own working spaces- clean your space after you have used it.

-Clean up any spillages straight away to prevent someone from slipping over.
- have your hair tide up and don't wear any jewelry. If silicone gets in your hair it will be a struggle to get out.


Things to remember
-Supe Baldiez (Mix with alcohole, which is actually gentler on your models skin)
-Baldiez- Mix with acetone.

Thursday 26 November 2015

Plants

 I've been watching snippets of documentary's on flowers to get a better understanding of it all. From watching this I found out the functions of the largest flower in the world! And it gave me some ideas for my own design by knowing the insides and outs of larger flowed I'm not saying I'm going to be creating the worlds biggest flower but I found this interesting for my piece 

I decided to have my flower as a rose a very common flower in Britian and seen as a romantic gesture  to give someone a rose  to play with the concept of 'we've become what we've destroyed' and the scarification aspect I want to incorporate. watching how roses bloom will help me choose the stage of rose I want to create and I want to after watching this create a flower in full bloom! I love the petals and the structure of the petals how they eloquently join together. I also love how roses have thorns and how I could incorporate the thorn aspect within my piece. 


I decided to look at different textures of tree bark to see what kind of texture I wanted to create. Also how I would want to relate the texture to the human  body to see what would work best.
I like this texture as I like how it has different layers too it and how its very rough and how the layers over lap. Although I don't see how it correlates that well with the human body.
                                                

Why I choose this image to explore is the bumpy texture which I feel could relate to skin acne I like how its split into segements and feel it works well although I don't want to create a bumpy surface so it doesn't look like horns as such. 
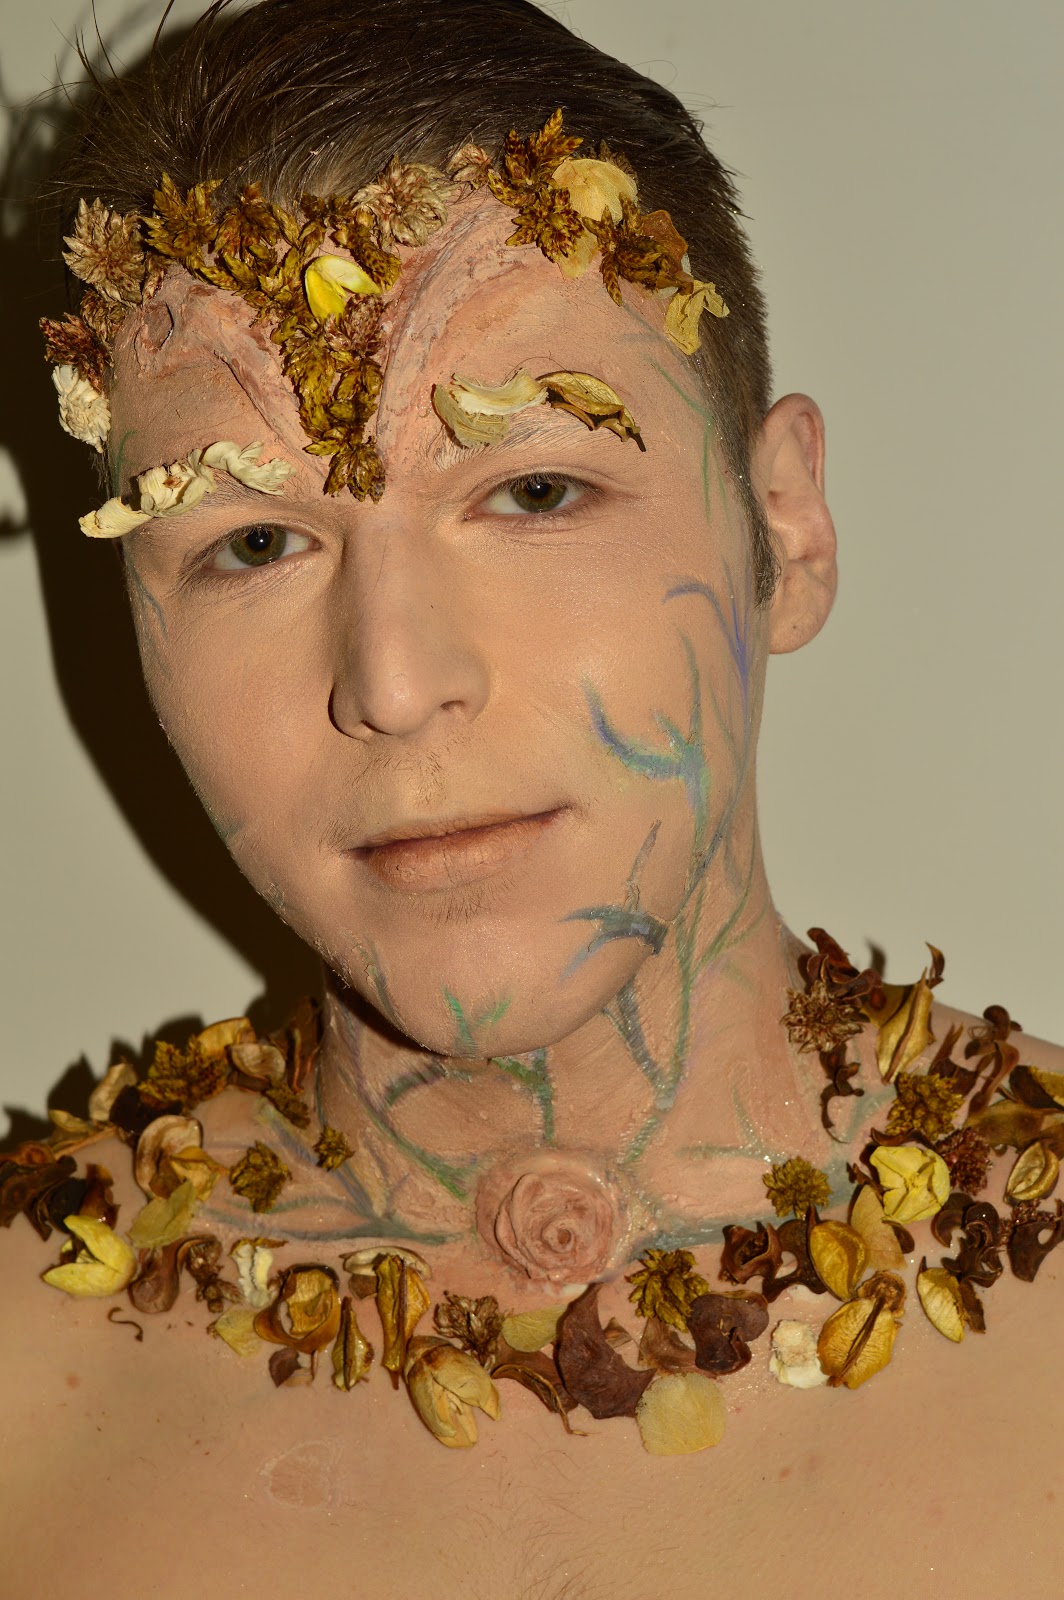
 I partially like this as I feel it could work well in being seen as human skin, The rigid texture and edges and texture I and how it feels cracked and damaged that I could relate to cracked skin. I will use this texture for my final After trying it out I feel it will give me the best out come and not be too over powering.

Flowers


Flowers! I decided to create a rose for my main piece I tried out different textures and sizes I felt that the flower with very smooth texture didn't really go with my concept of the suffereing side so I decided to rough up the edges and etch into the flowers slightly to make some of the petals look slightly broken I really enjoy moulding the flowers and trying out different looks as its quite therapeutic. although a silly mistake of mine was to create them firstly with them being lifted up as you can't have any silicone going underneath the flower so I just readjusted  my flower so that wasn't an issue. For my branches I wanted them to look slightly different sizes nothing too noticeable but just to make it not look exactly perfect to have it more of a deformity. I'm excited to get moulding!

Edward scissor hands


EDWARD SCISSOR HANDS

As I want to use scarification the perfect film to look at is Edward scissor hands!  The iconic look for scarification I love how ridgid the scars look and how you can feel the pain from looking at them  I do love the colour of the scars too as I like how their skin colour but have a slight tint of purple making them look old I also like how they've Incorporated how he has scissors for hands and how that does effect him as it wouldn't be as realistic if he a perfect completion but seeing the scars and un evenly cut hair makes you feel a sense of pity for him as theirs nothing he can do. after watching some you tube clips and and interview with the make-up artist that created the iconic look I decided to create my own to just try out the technique. I used ridged collion to which basically tightens the skin to create the effect of a scar. Firstly I drew a purpley  colour for the scar on the head  and did approximately 6 layers of the product then powdered to get rid of some shine for the one on the nose I wanted it too look like stitches are needed so I drew a red line using supra colour  and used the ridged collodion approximately 6 times again. then powdered afterwards. After doing this process I realized its quite an easy technique and will defiantly be using it for my final look as I love the effect it gives off and I really want to use scarification within my work.


Second degree burn

after doing my research on what makes 2nd degree burns and different types of the burn I decided to go with a blister that was caused by scolding the arm in boiling water I want the placement on the middle of the forearm

sculpting!!!
Firstly I had my plastic flat tray that had no marks or bumps on it to not show up during the moulding, I heated up my clay with a hair dryer  to make it easier to work with I decided to create  two blisters joined together with a curve I added texture to the blister as blisters are usually quite smooth appearing I also played around adding finger prints into it to create the skin like texture then I  used my tools to make the skin around the blister look flakey.

After making the mould I got my cup cut off the top then with a glue gun secured it around the edges to make sure the silicone doesn't leak out.


Then spray with fixing spray and shake it well before spraying.
Let it dry!!  Spray with petro lease shake well again so it's not too shiny and has droplets
Stuff to keep in mind is that silicone hates aloe Vera and garlic and latex so won't set if it's around any of those
The next step was to cover my work space and scales with cling film to make sure it was all covered so no products could leak on to it. It's very important to work clean with silicones as you can't mix A & B together so it's important to remember to make your sticks A & B  and to change your gloves when using the different product and to clean with a baby wipe to ensure its kept separate.
To get it to set properly you always need equal amounts of A&B for this I used 10 of each mixed well tapping the cup to make sure no air bubbles  change your gloves when going from measuring A & B
Then pour the mixture over the sculpture you have to work fast so the silicone doesn't set.

After that has set you start making your positive!
Firstly clean your mould with alcohol, spray with petrol ease (shake well)
Mix super boldez its alcohol in prop ration 1:2
Avoiding air bubbles pour mixture into your mould wait for it to dry then apply your second layer.
Any waste product needs to be wiped out

After that's dry you mix silicone A&B and deander I did 10 grams of a 10 grams of B  and 17 grams of deander,  deander is the agent of silicone that makes it flesh likes. I maked sticks A, B and C not to get confused and mix them up and changed my gloves each time I used a different product.
Once they were mixed together I added my droplets of pigments I used a pale skin colour and white you don't need to add too much off the pigment mix well and gently tap on the table to get rid of any bubles then pour over the mould working quickly as my first time I waited too long so it didn't set properly and I had to re- do the process also my mould was flat as I must have moved it while it wasn't set so I had to prop it up with sticks but once I did it again it worked perfectly. While spreading the product use a ruler to make sure the top surface is even by spreading the product across evenly.
You wait for that to dry and the with talc you brush the edges up slowly making sure you don't rip it and keep brushing slowly and adding talc till you can remove your piece!

WOUNDS!

In class we were given types of wounds that we pulled out of a box and the wound that I pulled out was a second degree burn! My first thoughts were what caused it, where was it on the body, the difference between burns... So I had to do some research and images before I thought about creating my wound!


Heat burns  are caused by fire, steam, hot objects, or hot liquids. Scald burns from hot liquids are the most common burns to children  and older adults.
·         Cold temperature burns are caused by skin exposure to wet, windy, or cold conditions.
·         Electrical burns are caused by contact with electrical sources or by lightning.
·         Chemical burns are caused by contact with household or industrial chemicals in a liquid, solid, or gas form. Natural foods such as chili peppers, which contain a substance irritating to the skin, can cause a burning sensation.
·         Radiation burns are caused by the sun, tanning booths, sunlamps, X-rays, or radiation therapy for cancer treatment.
·         Friction burns are caused by contact with any hard surface such as roads carpets, or gym floor surfaces. They are usually both a scrap and a heat burn. Athletes who fall on floors, courts, or tracks may get friction burns to the skin. Motorcycle or bicycle riders who have road accidents while not wearing protective clothing also may get friction burns. For information on treatment for friction burns, see the topic Scrapes.

A burn is a type of injury to flesh or skin caused by heat, electricity, chemicals, friction, or radiation.[1] Burns that affect only the superficial skin are known as superficial or first-degree burns. When damage penetrates into some of the underlying layers, it is a partial-thickness or second-degree burn. In a full-thickness or third-degree burn, the injury extends to all layers of the skin. A fourth-degree burn additionally involves injury to deeper tissues such as muscle or bone