


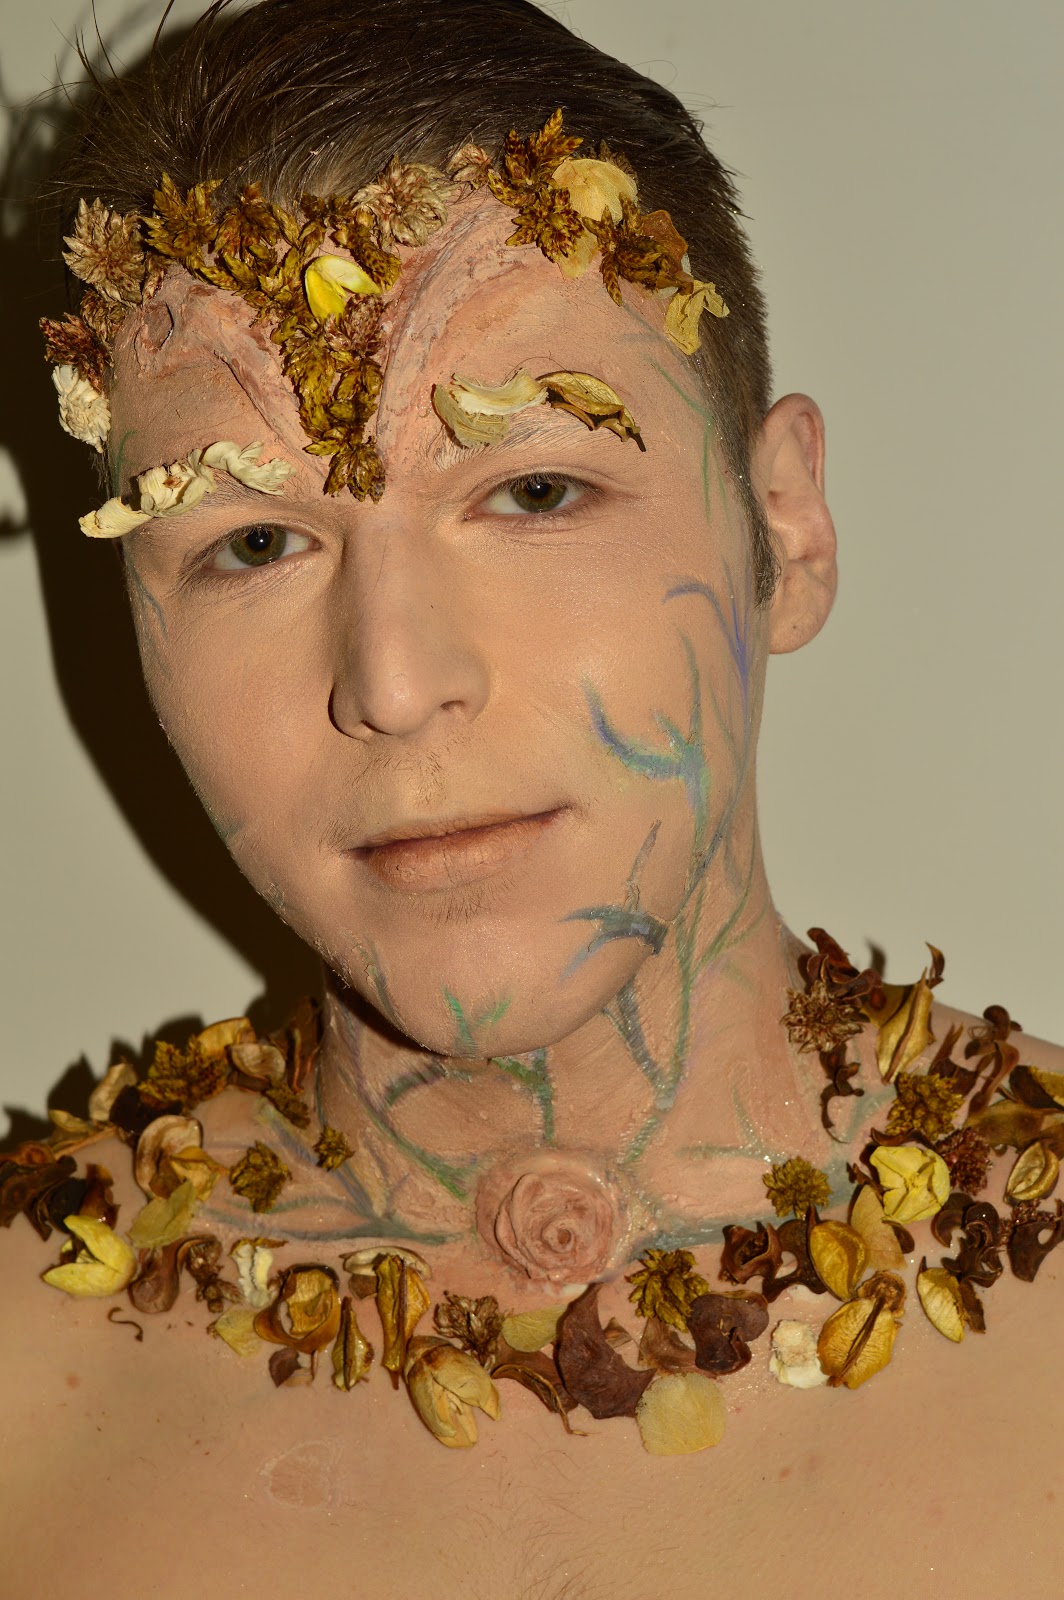


These are my final images for my Human Hybrid firstly I started by applying my silicone molds which I explained the process in my next post. I then started by using foundation and blending onto the ears and chest after I had finished using my Kryolan pallet I then went onto drawing out my roots(veins) I chose to do to use greens, purples and light blues to add some colour into the face and make it a bit more dramatic and eye catching after I finished drawing on my roots I then started to do my layers of ridged collion I did around 4 layers and my model moved while it was setting so it slightly split although at first I did panic I found that I liked the look it gave to the cracked looking skin. I decided that I wanted to paint my flower using kryolan foundation using the same colour I used all over the face and body and then using slightly darker and lighter foundations to highlight and use in the shadows. After I was pleased with the look I powdered then I drew fine lines of illamsaqua white base foundation onto the eyebrows. For my branches I firstly painted them the same colour foundation to the face then with my flesh tone pallet I started dabbing other flesh tones into the branches adjusting to get the look of a rough texture I did try it all brown but I felt that didnt work so I went with the foundation colour and worked on top of that which I feel in the end worked well as to give off the rough bark look. Then added a nude brown and slightly metallic gold to the lips. Once that was all done I added Laura Mercier candle glow to the cheek bones nose and eye lids to add some shine. Then onto the hair I gelled all the hair back with a comb then sprayed with some gold glitter spray once the hair was all back I then started choosing which flowers I started to stick down and place around and in between the branches chose which flowers I wanted to replace the eyebrows with and then covered the chest area with them almost creating a boarder around I used Pros aid to attach my flowers I chose the browns, yellows and whites as I wanted it too be neutral colors. Overall I am happy with my final piece! I feel it works well with my concept and I love the final look and I feel proud that I completed it. The rose as a center point worked well and although I was worried that the branches may look like some sort of horns I feel by having the flowers it really transformed the look! If I were to do this again I would then add more layers of the ridged collidon to make the scars look even deeper as I do love the ones where you can see it looks deep but I would try and use a natural colour for them If I were to do this again but I'm happy with it over all and feel for my first attempt it can only progress and develop my ideas further for the future!
The process of making my molds for my hybrid
Firstly with fixing spray, spray the sculpted pieces lightly and wait for the pieces to go matte,.making sure you have a window open.
Then Spray your mold with Petrolease . Dont spray too much as it takes awhile to dry
Lay some cling film over your scales and work surface
Label a spatular with the letter 'A' and another spatula with the letter 'B'. This is so you know you are using Sillicone A and Sillicone B. This ensures you don't contaminate Silicones A and B
Label a spatular with the letter 'A' and another spatula with the letter 'B'. This is so you know you are using Sillicone A and Sillicone B. This ensures you don't contaminate Silicones A and B
Measuring out 15grams of a into my cup using scales
with the same cup measure 15grams of Sillicone B in this cup. The quantities have to be exactly the same or the Silicone will not set and your piece will be ruined. mixing it well and tapping gently if any air bubbles occur
with the same cup measure 15grams of Sillicone B in this cup. The quantities have to be exactly the same or the Silicone will not set and your piece will be ruined. mixing it well and tapping gently if any air bubbles occur
Once mixed thoroughly, pour this all over your molds, making sure all of the mold to the top is covered. Then leave your molds to stand for roughly an hour to give this time to harden.
After the Silicon has become non-sticky and rubbery like take your molds out.
Clean your molds with Alcohol.
Spray your mold with Petrolease and wait to dry
Pour some Alcohol into a cup with baldez and mix this up. The mixture should be 1-2. One of baldez and two IPA. This mixtures does not have to be exact like the silicone does.
Then with a paintbrush brush over the mold area getting this into the center especially with my rose I had to concentrate on covering it. Once a light coating has been applied wait for this to dry then apply a second layer
After the Silicon has become non-sticky and rubbery like take your molds out.
Clean your molds with Alcohol.
Spray your mold with Petrolease and wait to dry
Pour some Alcohol into a cup with baldez and mix this up. The mixture should be 1-2. One of baldez and two IPA. This mixtures does not have to be exact like the silicone does.
Then with a paintbrush brush over the mold area getting this into the center especially with my rose I had to concentrate on covering it. Once a light coating has been applied wait for this to dry then apply a second layer
After that's dry you mix silicone A&B and deander I did 15 grams of a 15 grams of B and 23 grams of deander, deander is the agent of silicone that makes it flesh likes. I maked sticks A, B and C not to get confused and mix them up and changed my gloves each time I used a different product.
Once they were mixed together I added my droplets of pigments I used a pale skin colour and white you don't need to add too much off the pigment mix well and gently tap on the table to get rid of any bubbles then pour over the mold working quickly as my first time I waited too long so it didn't set properly and I had to re- do the process also my mold was flat as I must have moved it while it wasn't set so I had to prop it up with sticks but once I did it again it worked perfectly. While spreading the product use a ruler to make sure the top surface is even by spreading the product across evenly.You wait for that to dry and the with talc you brush the edges up slowly making sure you don't rip it and keep brushing slowly and adding talc till you can remove your piece!


