Tuesday, 1 December 2015
Evaluation
I am really pleased with my final outcome of my hybrid I feel that I wasn't too stressed through out the assessment It took me around 5 hours to create I feel that I spent more time trying to get it perfect and finalised. One aspect that I would have liked to enhance is the use of ridgid collidion for my scarification but my model didn't like the feel of it tightening around his neck so I didn't do too many layers I did 4 layers which did work effectively and the cracking around the skin and neck orginally I didn't really like but adjusting it worked well as I feel it added to the look, also doing the roots ( veins) in green, purple and blue adding more colour too it as I feel it could have looked bland without it and it added to the mythical feel I wanted. using the flowers and leaves around my silicone branches really worked well I feel it added more drama to the look I enjoyed attaching the pieces And I liked how it framed my work . Im really happy with the placement of my flower I feel it was perfect where it was it looked like the source of the hybrid which I wanted, The top edge of the flower didn't blend in exactly like I wanted which I would go back and change. Also in hindsight I wouldn't have painted my models eyebrows white I would have just added a slight touch of foundation over them. The branches I firstly started to build up the colour and I wanted them to have a lot of dark colours on it but when adding the dark brows it didn't work out as well so I decided to have them the same colour as the foundation which I feel worked out better. I did work very hard on my hybrid and I'm not the best with technology so when it came to taking my photos I wasn't sure on the settings so that's an aspect as I feel my hybrid looked a lot better than was photographed but that's my own fault for not pre planning the settings The application of the silicone took awhile and concentration to blend in the edges but once that was done I really enjoyed buliding up the colours and creatin my final piece! over all I'm very pleased with the out come and I loved this project and wish it lasted longer, it has given me self belief and confidence for the future!

Moodboard for hybrid

Sunday, 29 November 2015


Application!
I really concentrated on my application as I did want it to feel as if my pieces were part of the body.Firstly I cleaned my mould to get rid of any talc or dust left on from removing it then you apply Pros aid too where you want to apply your piece and on the piece its self you wait a few moments till the glue goes clear on both the skin and the mould if you don't wait for it too go clear then you may have the issue of seeing the glue underneath your piece which isnt something you want the you press it down onto the skin once the glue has dried. Once its attached you take a cotton bud and alcohol and start blending untill I was pleased with the out come I found this the most time consuming as it does take awhile to get the edges blended but I do feel that the application went well and I was especially pleased with my flower as I found that hardest to blend out.
Saturday, 28 November 2015
Human hybrid
using the concept of a physical transformation as part of my character of brave new world!
My hybrid is going to be representing deforestation and how we've become the things that we've destroyed (nature) I want my character to show that we humans have evolved into creatures of nature using aspects from nature such as branches, trees, flowers, leaves etc I want to use vains( roots) going up the neck and body of my hybrid and using them as part of scarification to show the pain and suffering. I want to have the flower in the centre of the neck Inbetween the collor bones and have he roots coming from the flower. Using the scaring liquid rigid colldion.
This was my first idea of my hybrid

 I wanted to branch like pieces coming from the eyebrows to the top of the head, create vains under the eyes, contour the cheeks drastically have roots (vains ) coming from the flowers and have different type of flowers on the chest area. But after thinking over my look I felt I could make it more interesting by having too branches going from each side then having flowers, leaves etc filling the gap in the head and having flowers on top of the eyebrows then filling the eyebrows in white and having only one flower on the chest as a main feature and to have the roots coming from the flower as if its the source of the pain.I was going to do the roots as neutral colours but I decided to do them like purples and greens to add colour into my piece then covering them with ridgid collidion to create the scarification and got rid of the vains under the eyes as I felt it was too much and did some slight strobing on top of the cheek bones. I want the flower and branches to be skin colour so it looks part of the body.
My hybrid is going to be representing deforestation and how we've become the things that we've destroyed (nature) I want my character to show that we humans have evolved into creatures of nature using aspects from nature such as branches, trees, flowers, leaves etc I want to use vains( roots) going up the neck and body of my hybrid and using them as part of scarification to show the pain and suffering. I want to have the flower in the centre of the neck Inbetween the collor bones and have he roots coming from the flower. Using the scaring liquid rigid colldion.
This was my first idea of my hybrid

 I wanted to branch like pieces coming from the eyebrows to the top of the head, create vains under the eyes, contour the cheeks drastically have roots (vains ) coming from the flowers and have different type of flowers on the chest area. But after thinking over my look I felt I could make it more interesting by having too branches going from each side then having flowers, leaves etc filling the gap in the head and having flowers on top of the eyebrows then filling the eyebrows in white and having only one flower on the chest as a main feature and to have the roots coming from the flower as if its the source of the pain.I was going to do the roots as neutral colours but I decided to do them like purples and greens to add colour into my piece then covering them with ridgid collidion to create the scarification and got rid of the vains under the eyes as I felt it was too much and did some slight strobing on top of the cheek bones. I want the flower and branches to be skin colour so it looks part of the body.
Hybridssss!!!!!!


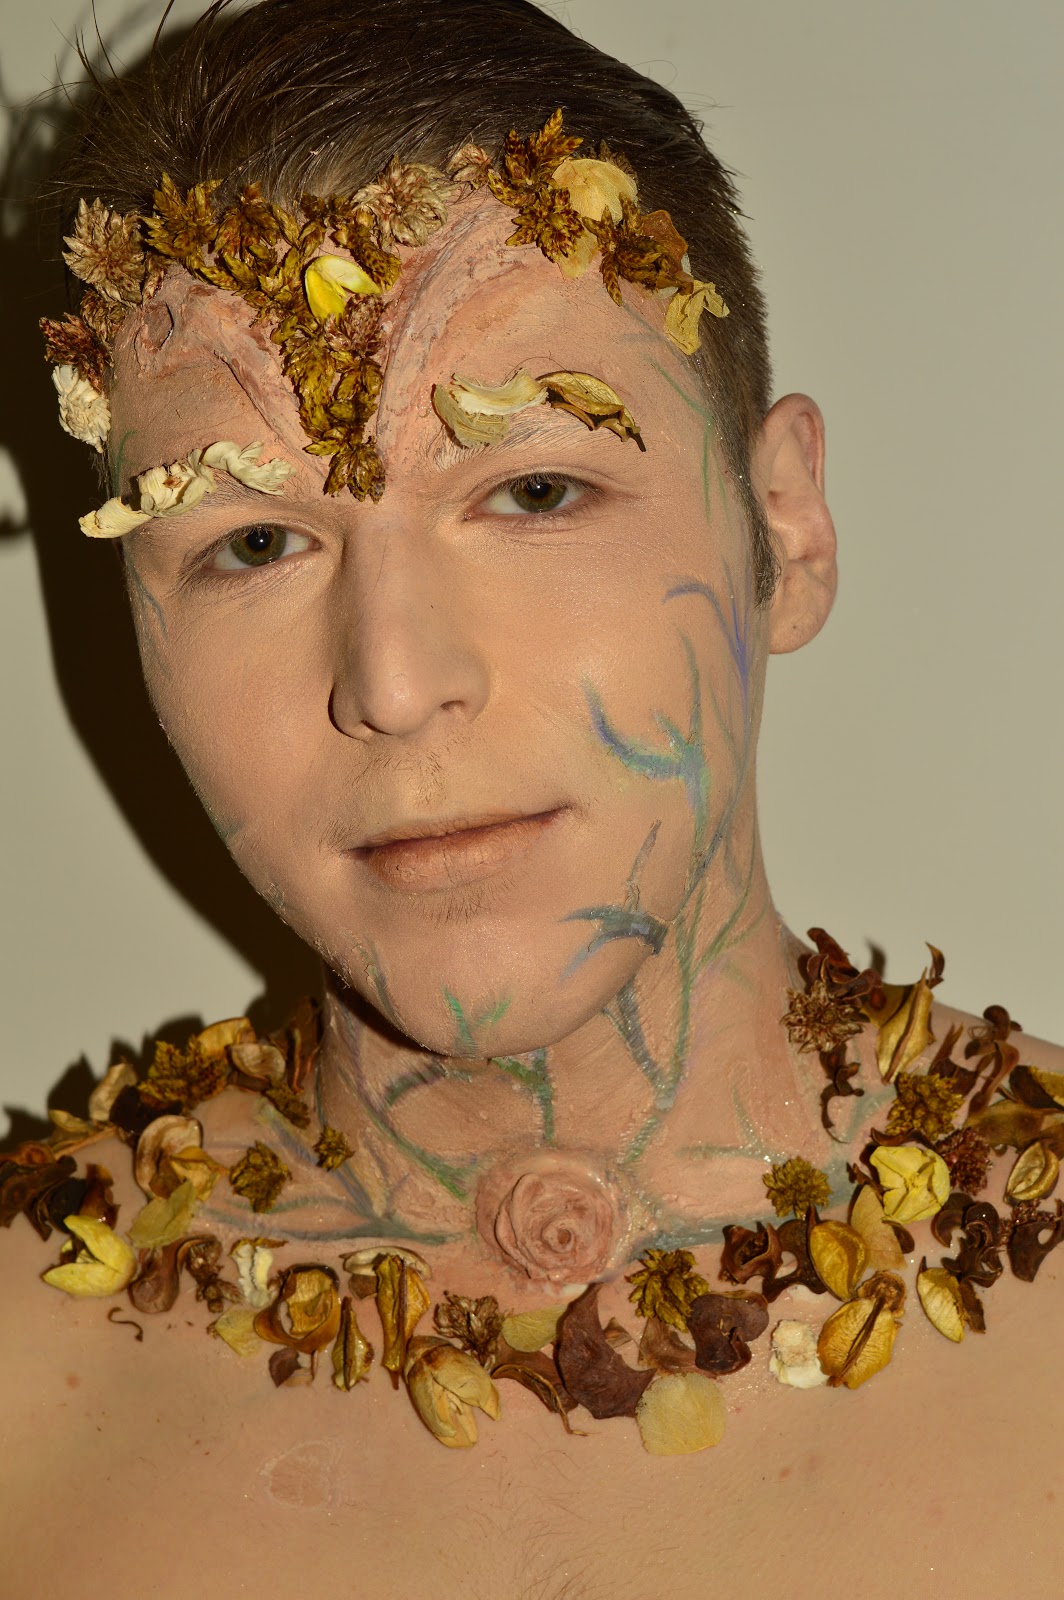


These are my final images for my Human Hybrid firstly I started by applying my silicone molds which I explained the process in my next post. I then started by using foundation and blending onto the ears and chest after I had finished using my Kryolan pallet I then went onto drawing out my roots(veins) I chose to do to use greens, purples and light blues to add some colour into the face and make it a bit more dramatic and eye catching after I finished drawing on my roots I then started to do my layers of ridged collion I did around 4 layers and my model moved while it was setting so it slightly split although at first I did panic I found that I liked the look it gave to the cracked looking skin. I decided that I wanted to paint my flower using kryolan foundation using the same colour I used all over the face and body and then using slightly darker and lighter foundations to highlight and use in the shadows. After I was pleased with the look I powdered then I drew fine lines of illamsaqua white base foundation onto the eyebrows. For my branches I firstly painted them the same colour foundation to the face then with my flesh tone pallet I started dabbing other flesh tones into the branches adjusting to get the look of a rough texture I did try it all brown but I felt that didnt work so I went with the foundation colour and worked on top of that which I feel in the end worked well as to give off the rough bark look. Then added a nude brown and slightly metallic gold to the lips. Once that was all done I added Laura Mercier candle glow to the cheek bones nose and eye lids to add some shine. Then onto the hair I gelled all the hair back with a comb then sprayed with some gold glitter spray once the hair was all back I then started choosing which flowers I started to stick down and place around and in between the branches chose which flowers I wanted to replace the eyebrows with and then covered the chest area with them almost creating a boarder around I used Pros aid to attach my flowers I chose the browns, yellows and whites as I wanted it too be neutral colors. Overall I am happy with my final piece! I feel it works well with my concept and I love the final look and I feel proud that I completed it. The rose as a center point worked well and although I was worried that the branches may look like some sort of horns I feel by having the flowers it really transformed the look! If I were to do this again I would then add more layers of the ridged collidon to make the scars look even deeper as I do love the ones where you can see it looks deep but I would try and use a natural colour for them If I were to do this again but I'm happy with it over all and feel for my first attempt it can only progress and develop my ideas further for the future!
The process of making my molds for my hybrid
Firstly with fixing spray, spray the sculpted pieces lightly and wait for the pieces to go matte,.making sure you have a window open.
Then Spray your mold with Petrolease . Dont spray too much as it takes awhile to dry
Lay some cling film over your scales and work surface
Label a spatular with the letter 'A' and another spatula with the letter 'B'. This is so you know you are using Sillicone A and Sillicone B. This ensures you don't contaminate Silicones A and B
Label a spatular with the letter 'A' and another spatula with the letter 'B'. This is so you know you are using Sillicone A and Sillicone B. This ensures you don't contaminate Silicones A and B
Measuring out 15grams of a into my cup using scales
with the same cup measure 15grams of Sillicone B in this cup. The quantities have to be exactly the same or the Silicone will not set and your piece will be ruined. mixing it well and tapping gently if any air bubbles occur
with the same cup measure 15grams of Sillicone B in this cup. The quantities have to be exactly the same or the Silicone will not set and your piece will be ruined. mixing it well and tapping gently if any air bubbles occur
Once mixed thoroughly, pour this all over your molds, making sure all of the mold to the top is covered. Then leave your molds to stand for roughly an hour to give this time to harden.
After the Silicon has become non-sticky and rubbery like take your molds out.
Clean your molds with Alcohol.
Spray your mold with Petrolease and wait to dry
Pour some Alcohol into a cup with baldez and mix this up. The mixture should be 1-2. One of baldez and two IPA. This mixtures does not have to be exact like the silicone does.
Then with a paintbrush brush over the mold area getting this into the center especially with my rose I had to concentrate on covering it. Once a light coating has been applied wait for this to dry then apply a second layer
After the Silicon has become non-sticky and rubbery like take your molds out.
Clean your molds with Alcohol.
Spray your mold with Petrolease and wait to dry
Pour some Alcohol into a cup with baldez and mix this up. The mixture should be 1-2. One of baldez and two IPA. This mixtures does not have to be exact like the silicone does.
Then with a paintbrush brush over the mold area getting this into the center especially with my rose I had to concentrate on covering it. Once a light coating has been applied wait for this to dry then apply a second layer
After that's dry you mix silicone A&B and deander I did 15 grams of a 15 grams of B and 23 grams of deander, deander is the agent of silicone that makes it flesh likes. I maked sticks A, B and C not to get confused and mix them up and changed my gloves each time I used a different product.
Once they were mixed together I added my droplets of pigments I used a pale skin colour and white you don't need to add too much off the pigment mix well and gently tap on the table to get rid of any bubbles then pour over the mold working quickly as my first time I waited too long so it didn't set properly and I had to re- do the process also my mold was flat as I must have moved it while it wasn't set so I had to prop it up with sticks but once I did it again it worked perfectly. While spreading the product use a ruler to make sure the top surface is even by spreading the product across evenly.You wait for that to dry and the with talc you brush the edges up slowly making sure you don't rip it and keep brushing slowly and adding talc till you can remove your piece!
Friday, 27 November 2015
Rick baker
https://en.wikipedia.org/wiki/Rick_Baker_(makeup_artist)
https://en.wikipedia.org/wiki/Rick_Baker_(makeup_artist)#/media/File:Rick_Baker_February_2015_(cropped).jpg
http://www.theguardian.com/film/2015/may/29/rick-baker-retire-monster-maker-hollywood-effects
 Rick baker started making prosthetic pieces in his own kitchen, he started off being the assistant to prosthetic makeup effects veteran Dick Smith on the film The Exorcist. Then he got his inaugural Academy Award for Best Makeup and Hairstyling for his work on An American Werewolf in London He also created the "werecat" creature Michael Jackson transforms into in the music video ThrillerBaker has been nominated for the Best Makeup and Hairstyling Oscar ten more times, winning on seven occasions, both records in his field. On wards from that hes been creating beautiful creatures for films such as men n black. I really like how the detail of every creature really stands out for example they may have similar features but all have their own personality within the piece that makes them individual. And you can see the dedication he puts into each piece that does make me want to make mine to the best of my ability.
I really respect baker as in an interview he says;
“I said the time is right, I am 64 years old, and the business is crazy right now. I like to do things right, and they wanted cheap and fast,” said Baker. “That is not what I want to do, so I just decided it is basically time to get out.
which I feel is the positive and right attitude to produce the best quality of work and from looking at his work I really aspire to it.


https://en.wikipedia.org/wiki/Rick_Baker_(makeup_artist)#/media/File:Rick_Baker_February_2015_(cropped).jpg
http://www.theguardian.com/film/2015/may/29/rick-baker-retire-monster-maker-hollywood-effects
Rick baker started making prosthetic pieces in his own kitchen, he started off being the assistant to prosthetic makeup effects veteran Dick Smith on the film The Exorcist. Then he got his inaugural Academy Award for Best Makeup and Hairstyling for his work on An American Werewolf in London He also created the "werecat" creature Michael Jackson transforms into in the music video ThrillerBaker has been nominated for the Best Makeup and Hairstyling Oscar ten more times, winning on seven occasions, both records in his field. On wards from that hes been creating beautiful creatures for films such as men n black. I really like how the detail of every creature really stands out for example they may have similar features but all have their own personality within the piece that makes them individual. And you can see the dedication he puts into each piece that does make me want to make mine to the best of my ability. I really respect baker as in an interview he says;
“I said the time is right, I am 64 years old, and the business is crazy right now. I like to do things right, and they wanted cheap and fast,” said Baker. “That is not what I want to do, so I just decided it is basically time to get out.
which I feel is the positive and right attitude to produce the best quality of work and from looking at his work I really aspire to it.

Looking at these I love the texture he puts into his work the brain is very neat and excellently executed with with them going down the front lobe also I like how the ear is out lined as humans would usually have ears there . I'm especially interested in his work a she does do a lot of high breads as the 'brain man' has human features such as the eyes nose and mustache which helps me think of ideas that I can work with on my hybrid.
voldemort

I decided to look at the magnificent Lord Voldemort an iconic hybrid that is half human with snake like features. The build up to what 'he who must not be named' looked like was executed amazingly as this creature with the half formed nose and features and veins on the head which inspired me to try with the veins I wanted to create for my own hybrid what researching lord Voldemort taught me is that not all of it was make-up some of it was filming effects such as the nose As the actor Ralph Fiennes’ didn't want too much make-up as he felt it would effect the way he acted in his role and wanted too act freely. I do like the idea of the bald cap and and adding veins too my look I love how it looks indented into his head. The make-up artist Sean Harrison worked well with the visual effects team to create such a remembered character. The fear factor that lord Voldemort brings is such and important factor that theyve worked with so well The only make-up he had on during scenes were the eyebrow pieces and the veins on his head.

How long does this sinister makeover take? At least two-and-a-half hours for Fiennes, who viewed the time as essential to his portraying the full evilness of You-Know-Who. “A certain look that you have helps you locate who you’re being. You look at yourself in the mirror, you see this face, and you say, ‘I know who I am,’” Fiennes told MTV News.
This quote shows me how important makeup is within getting the actor into charter it helps them feel the role and enhances the performance. an d where he says you look in the mirror and say 'I know who I am' has taken to me as the audience will feel the same.
http://www.harrypotterfans.com/2011/04/ralph-fiennes-chilling-voldemort-transformation/
Subscribe to:
Posts (Atom)